
Dashboard for RaspPi-controlled toy sailboat with Node-RED
Sail Away

© Lead Image © shamain, 123RF.com
With Node-RED, you can create a web dashboard that instructs a Raspberry Pi to set the rudder position on a toy sailboat.
My daughters and I have built a number of toy boat projects with an assortment of Arduino, ESP8266 (WiFi), Bluetooth, and radio frequency interference (RFI) components, but the version we created for this article using a Raspberry Pi and Node-RED [1] offers one of the simplest solutions. The sailboat uses a basic catamaran design with a Raspberry Pi mounting inside a waterproof container. With Node-RED dashboards, you can control the sailboat's rudder from a smartphone. The complete Node-RED logic comprises only six nodes.
Building the Sailboat
Of the many different building materials from which you could choose, K'Nex construction pieces [2] are lighter than either Lego or Meccano, and they allow you to create reasonably large structures with a minimum number of pieces. If you do not have access to K'Nex pieces, popsicle sticks and cardboard would offer a good low-cost solution.
To build the sailboat we used:
- K'Nex building pieces
- Four plastic bottles
- Small plastic container with a lid
- String
- Duct tape
- Garbage bag
- Low-torque servo
- Raspberry Pi Zero W or 3
- Small USB phone charger
The base of the sailboat was a rectangular structure with 16 water-facing K'Nex pieces that allowed plastic bottles to be duct-taped in place (Figure 1). A few K'Nex pieces created a compartment for the servo, and wire secured the servo in place. A rudder was built by screwing a small piece of wood into the servo arm (Figure 2). A garbage bag was cut to the required size and taped to the mast to form a sail. The boom had a swivel connection to the mast and guide ropes connected to both the boom and mast (Figure 3).
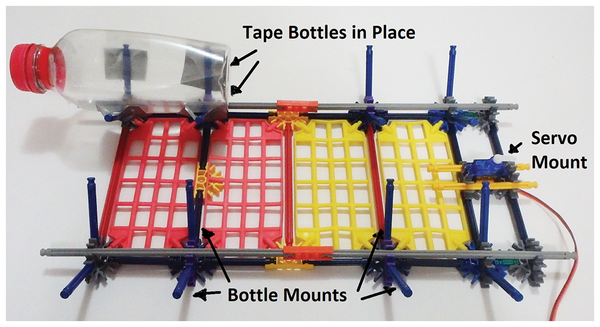 Figure 1: Sailboat base.
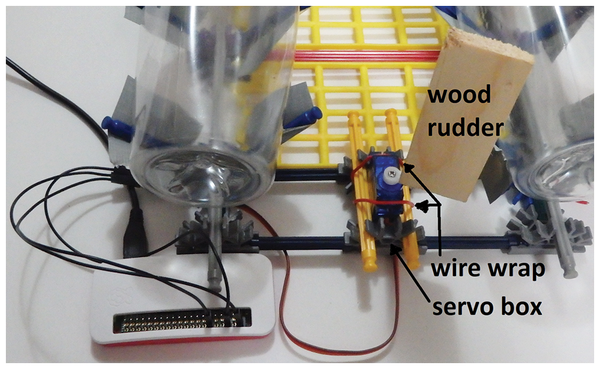 Figure 2: Servo and rudder mounting.
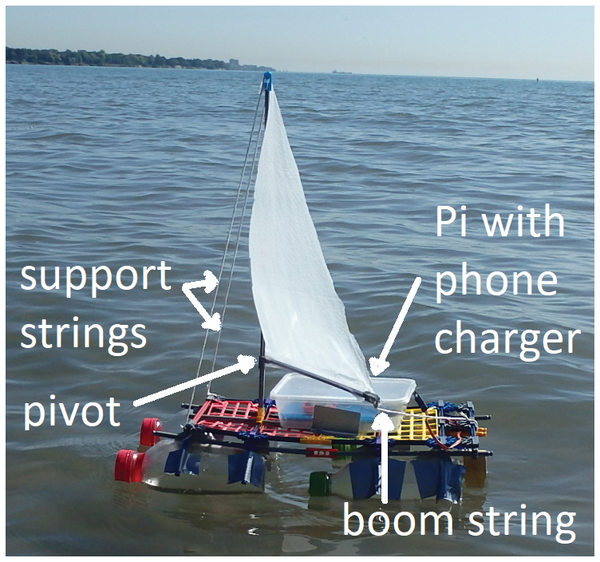 Figure 3: Sailboat top view.
Servo and Rudder
Only very low torque servos can be connected directly to Raspberry Pi GPIO pins (Figure 4). An example of a low-torque servo would be the TowerPro SG90 [3] ($4), which has a torque of 25 oz/in (1.80 kg/cm). If you have servos with greater torque, you will need to use either a custom Raspberry Pi servo hat (there are some good ones on the market) or a separate power and ground circuit for the servo.
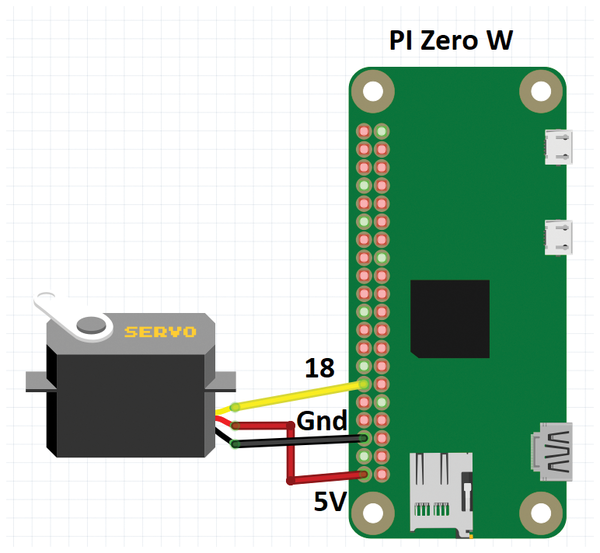 Figure 4: Raspberry Pi Zero W servo circuit.
The WiringPi gpio tool can be used to control the servo. This package is pre-installed on the Raspbian image, or it can be installed manually by entering:
sudo apt-get install -y wiringpi
Servos typically want a pulse frequency of 50Hz; however, the Raspberry Pi pulse width modulation (PWM) pins have a frequency of 19,200Hz, so some range definitions and scaling are required:
gpio -g mode 18 pwm  #define pin 18 as the PWM pin
gpio pwm-ms  # use "mark space" mode
gpio pwmc 192  # set freq as 19200
gpio pwmr 2000  # use a range of 2000
The gpio pwm commands are not persistent after a reboot. A simple solution for this problem is to put the above commands in the Pi user login file $HOME/.bash_login.
After running the PWM setup commands, you need to do some manual testing to define your various rudder (servo) positions (Figure 5), such as Hard Left, Hard Right, Easy Left, Easy Right, and Straight. The pwm timing numbers will vary according to your requirements and the positioning of the servo arm. We used the commands
gpio -g pwm 18 200 #straight
gpio -g pwm 18 260 #hard left
gpio -g pwm 18 140 #hard right
gpio -g pwm 18 230 #easy left
gpio -g pwm 18 170 #easy right
for our sailboat.
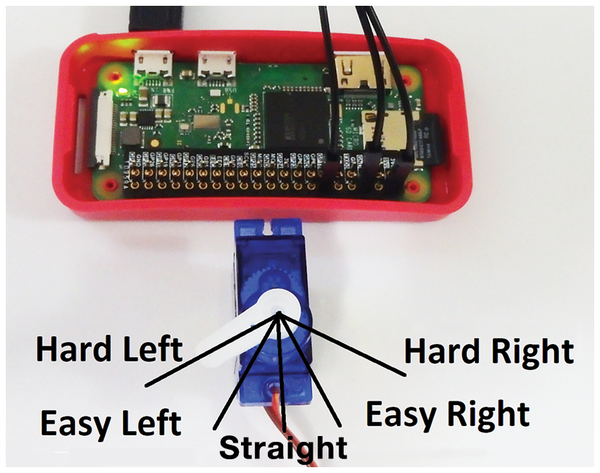 Figure 5: Servo/rudder settings.
Node-RED Logic and Dashboards
Node-RED is pre-installed on the Raspbian image, but it will need to be set to autostart on a Pi reboot with:
sudo systemctl enable nodered.service
The Node-RED web interface for configuration is accessed at http://localhost:1880 or http://<pi_ip_address>:1880. Selecting View | Dashboard brings up the options button on the far right (Figure 6), where you can define and change the web dashboard layout. To create logic, nodes are selected from the left node panel and dragged and dropped onto the center flow panel. Logic flow is then created by clicking and joining together the inputs and outputs on the nodes [4]. When a dashboard node is dropped onto the flow panel, it is added to the default web dashboard.
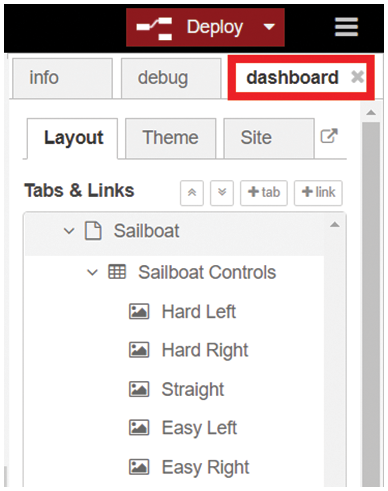 Figure 6: Node-RED dashboard layout.
To call the gpio -g pwm command, use the exec node (Figure 7). The button dashboard node will pass the defined payload value (e.g., a 260 is passed when the Hard Left button is pushed). The button's payload value is appended to the exec command to make a complete servo position command.
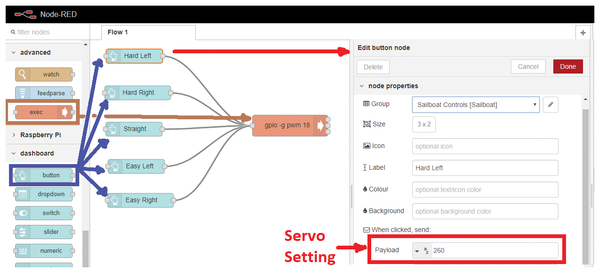 Figure 7: Node-RED logic.
Once you have completed your logic setup, press the Deploy button on the top right to make your configuration live and ready to test.
Buy this article as PDF
(incl. VAT)
Buy Linux Magazine
US / Canada
UK / Australia
Subscribe to our Linux Newsletters
Find Linux and Open Source Jobs
Subscribe to our ADMIN Newsletters
Support Our Work
Linux Magazine content is made possible with support from readers like you. Please consider contributing when you’ve found an article to be beneficial.

News
-
Red Hat Adds New Deployment Option for Enterprise Linux Platforms
Red Hat has re-imagined enterprise Linux for an AI future with Image Mode.
-
OSJH and LPI Release 2024 Open Source Pros Job Survey Results
See what open source professionals look for in a new role.
-
Proton 9.0-1 Released to Improve Gaming with Steam
The latest release of Proton 9 adds several improvements and fixes an issue that has been problematic for Linux users.
-
So Long Neofetch and Thanks for the Info
Today is a day that every Linux user who enjoys bragging about their system(s) will mourn, as Neofetch has come to an end.
-
Ubuntu 24.04 Comes with a “Flaw"
If you're thinking you might want to upgrade from your current Ubuntu release to the latest, there's something you might want to consider before doing so.
-
Canonical Releases Ubuntu 24.04
After a brief pause because of the XZ vulnerability, Ubuntu 24.04 is now available for install.
-
Linux Servers Targeted by Akira Ransomware
A group of bad actors who have already extorted $42 million have their sights set on the Linux platform.
-
TUXEDO Computers Unveils Linux Laptop Featuring AMD Ryzen CPU
This latest release is the first laptop to include the new CPU from Ryzen and Linux preinstalled.
-
XZ Gets the All-Clear
The back door xz vulnerability has been officially reverted for Fedora 40 and versions 38 and 39 were never affected.
-
Canonical Collaborates with Qualcomm on New Venture
This new joint effort is geared toward bringing Ubuntu and Ubuntu Core to Qualcomm-powered devices.